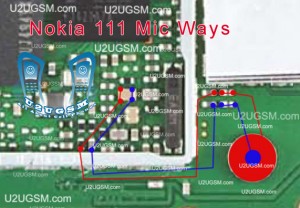
once you have dis assembled mobile phone look at board vary carefully and check if there is some rust or carbon.Clean
these parts and area with electronics cleaner and leave it to dry for a few mints with hot air.In above diagram all tracks are given in red and blue colors.these tracks show positive and negative paths of mic parts.so check these components and paths with electronics miter and if path missing apply jumpers.
Because mic is attached with board so you can remove it with solding iron by applying much solder on mic and then slip it once it is too hot.And use new mic to fix mic problem in Nokia 111.
for more detail and new tips and tricks about cellphone service problem keep visiting this page we will update cellphone service diagrams timely with new cellphone diagrams.some related post are also given bellow you can read them also for more information about cellphone.
to get new repairing cellphone diagrams and applications with email “Enter your email address for RSS:” at the right side at top and press “subscribe”
Sign up here with your email
Disclaimer.We are not affiliate with cell phone companies like Nokia,Samsung,Sony Ericsson,Lg,Motorolo and some other etc Manufacturers / Vendors .All trademarks are the property of the respective trademark owners.we just provide diagrams for study and repairing purpose.these images are uploaded by website visitors.so we will not be responsible for any loss or damage, including personal injury.for more detail read Terms and Conditions and Privacy and Policies at bottom.